
This article is more than 5 years old.
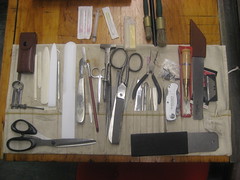 A canvas roll of tools used for book repair
What is the most preferred kind of leather for bookbinding? How do you quickly and easily attach loose boards to a leather volume? What adhesive is most useful for leather book repair applications? Is there an easy way to pare leather without doing it all by hand? These and many other questions were answered for a group of 7 preservationists from across North Carolina last week.On Thursday and Friday, July 24-25, a Leather Repair Workshop was held in the ZSR Preservation Lab. The workshop presenter was Jim Hinz, a Book Conservator at the Conservation Center for Art and Historic Artifacts in Philadelphia. The workshop was sponsored by the North Carolina Preservation Consortium, and was attended by preservationists from NC State, UNC-CH Medical Sciences Library, ECU, UNC-G and Duke. Because of bad weather, the workshop started late because Jim’s flight was canceled. By the time he arrived, however, everyone was more than ready to begin.
Jim began by discussing how leather has been processed and tanned over time, and how light, humidity and temperature fluctuations break leather down. Jim described how, over time, the processing of leather was better or poorer based on market demands and other factors. Today, leather is largely processed by a vegetable tanning process that makes it safe and stable. We then began a demonstration on “tacketing” – a process where a loose board (or cover) is re-attached to the book by sewing through a few locations along the shoulder of the book. This repair is a quick and easy way to the many loose covers of leather-bound books back where they belong. We also toned some Japanese paper with acrylic pigments and let them dry. These strips of paper were toned to match the color of the book’s cover and would be used to repair the broken joint on the outside of the book.
The second day of the workshop began with a discussion of how to hide the repair of the tackets with Japanese paper. We also tore pieces of the toned Japanese paper we had made the day before and covered the broken joint along the outside of the book. The paper blended perfectly because it was toned to the color of the book’s leather and it was a very light weight paper (Tengugo). We then discussed sharpening a paring knife using a sharpening stick (made from laminated board and sandpaper), oil or water stones, emery paper, or a leather strop. Jim demonstrated some sharpening techniques for the class. Following this, we examined various types and colors of leather-mostly calf and goat skins. Jim pointed out the grain and texture differences to the class. The next step was to prepare a book to be re-backed with leather. Starting with a suitable book, Jim lifted a layer of the boards on each side to allow the leather re-back to be inserted. He then applied heavy cord across the spine to simulate raised bands. We were then treated to a leather dyeing demonstration using leather dyes and fixative. Following this, Jim cut a piece of leather for the spine of the book and began paring it. He used a paring knife to pare the edges of the spine piece. The larger areas were pared using a paring machine which pared the leather to a thickness that would be very flexible as the book covers were opened and closed. Everyone got a chance to practice paring using the machine, paring knife and a sanding stick. The leather was then dampened and applied to the spine of the book where Jim expertly turned in the head and tail of the new spine and inserted the edges into the splits in the board. Jim then used a bone folder to reinforce the raised bands along the spine, and tied linen thread over each raised band to dry. The result was beautiful.
The answers to the questions in the first paragraph? goat; tacketing; PVA; and Scharf-Fix Paring Machine.
This workshop was packed with great information that frankly is just too hard to find. for some reason, these repair techniques are kept hidden in the conservator’s world and only trickles out when a knowledgeable and open-minded person like Jim Hinz comes along. I learned so much-not just information, but stiff I can use in my job from now on. That, my friends is invaluable! Another benefit from this workshop was spending 2 days with colleagues across the state who share similar jobs and concerns. I’m hopeful we’ll all be able to collaborate together again soon.
3 Comments on ‘Leather Book Repair Workshop’
Thanks for hosting, Craig. I enjoyed the environment, the company, and the mind-boggling amount of technical information relayed by Jim.
I look forward to working with you again.
Jamie
I must echo Jamie’s sentiments. As a relative newcomer to the world of book preservation, I was excited to learn a whole new dimension of book repair, and I particularly enjoyed getting to know all the other preservationists.
Thank you Craig!
Wonderful facilities, great workshop, fantastic folks and really appreciated the refreshments and lunches!!!